Happy Halloween! – DIY Monster Game

I found the idea off of Pinterest but I used what craft items I had in the house plus a bunch of plastic balls from our daughter’s ball pit stash.

It took me a few days and lots of paper and glue to put it together but our daughter is happy with it. I added a return tunnel to the front for easy access to the balls and a little door just for fun.

His eyes are drawn on plastic balls with paint pens. His teeth and the leaves on the “pumpkin” and “apple” balls were cut from foam sticker sheets.

I’m quite sorry I didn’t make instructions to this. As usual, I winged it.

This post includes affiliate links. We will earn a small commission on qualifying purchases made through any of our advertisement links. This is at no price change or extra charge to you. This is just a small way you can help to support keeping our blog up and running.

Snail Mail Love for Little Ones Part 1

Having to deal with Covid-19 in the beginning was really rough. We have a daughter who was in pre-school and a son in high school. They both had a hard time adjusting to doing online classes and not being able to see their friends. It was the rainy part of the year for Washington so we weren’t able to do a lot of outdoor playing in the beginning. We had to find activities to do indoors.

One of the activities we were able to do with our daughter to keep her occupied was sending out mail to our friends and family. She was also able to send a few out to her classmates since they couldn’t see each other in person and she was also able to send a few to some residents of the assistant living home where my mother-in-law resides.

We made different types of cards and letters to send out. It also allowed her practice writing her name and basic greeting words. This is such a great activity to do together. We still do this during the summer months but on a smaller scale because we get to spend more time outdoors now. I hope this is an activity that will inspire her to continue writing mail as she’s growing up.

She loves walking to the mailbox to place her cards in and put the flag up. She also absolutely loves going to mailbox to find mail addressed to her.

Here are a few of the mail we worked on. She’s quite the artist and loves crafting so this was right up her alley.

This post includes affiliate links. We will earn a small commission on qualifying purchases made through any of our advertisement links. This is at no price change or extra charge to you. This is just a small way you can help to support keeping our blog up and running.

2020-Making cards 6 Artsy

2020-Making cards 2 Artsy

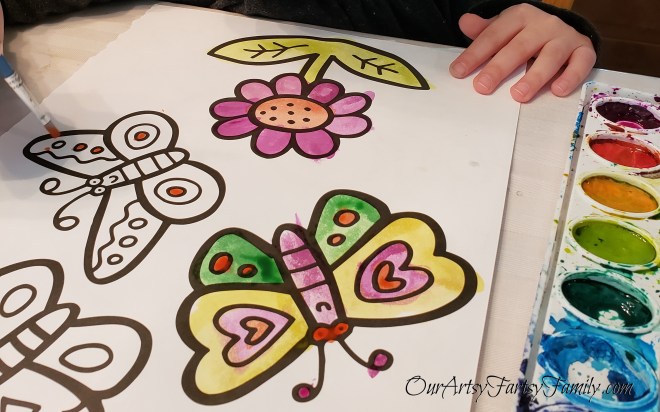
She painted coloring pages and addressed them and signed them. When folded up in to quarters it fits nicely into a 4 3/8″ x 5 3/4″ envelope. The coloring books in the ad below are our favorite for painting with watercolors because the pages are really thick. The pictures are very simple and big which makes it much easier for little ones to paint.


2020-Making cards1 Artsy

My college aged son and his girlfriend also drew some pictures for our daughter to paint. They used thick watercolor paper and a black sharpie to draw the pictures. The papers were cut with a trimmer to 4″ x 5 1/4″. We later glued the painted pictures to colored cardstock that were cut to 4 1/4″ x 5 1/2″ and folded in half. We love using the watercolor papers below because of it’s thickness.

We later used the supplies and the same process to make other greeting cards. We made some for Easter, a few simple “Hi!” and “Hello!” ones, and we also let our daughter use her creative side to create drawings and paintings of her own. The cards were well received and she got a great response from family and friends.

What are some of the indoor activities you did to help keep yourself or your children busy during the beginning of lock down?

DIY Pedestal Globe Candle Holder/Terrarium/Fish Bowl

DIY Pedestal Globe 4

This project was not complicated at all. I had a small silver vase from flowers given to me when I gave birth to our daughter and I purchased the small fish bowl from a local thrift shop for $.35.

I just inverted the flower vase and glued the two pieces together using the E6000 glue that I purchased from Michaels. You can add some glass marbles and a tealight for a cute centerpiece or you can also simply use this as a fish bowl (if the bowl is new and hasn’t been washed with soap).

My son helped to put together the terrarium pictured above. For directions on putting together your own terrarium see:
https://ourartsyfartsyfamily.com/2016/07/18/my-first-succulent-mini-garden/

DIY Pedestal Globe 1DIY Pedestal Globe 2

DIY Pedestal Globe 3

Update: DIY Terra Cotta Fairy House Planter with Mossy Stonecrop Sedum

Terra Cotta Planter with Plant

Directions for project: https://ourartsyfartsyfamily.com/2016/08/13/diy-terracotta-fairy-house/

Plant: Mossy Stonecrop Sedum

DIY Terra Cotta Fairy House


DIY Terra Cotta Fairy House Planter

I can’t wait to plant a cute fern or flower in this. This was pretty simple and quick to put together, even with my limited painting skills.

Materials

Terra cotta pieces – purchased from Henery Hardware

Decorative Door – Michaels

Marbles – Dollar store or Michaels (I had some left over from a previous project. Actually purchased mine from a local thrift store).

Glue for terra cotta, door and marbles – E6000 from Michaels

Instructions

1 – Paint each terra cotta piece.

2 – Seal pieces with a clear coat of spray enamel. (This planter is going outside in the mini garden I’m creating and I don’t want the paint to get washed away by the rain).

3 – Glue the two bottom pieces together. Leave the top pot free. It’ll be much easier to place a plant in it.

4 – Next, glue the door and marbles to the front of the bottom piece.

Terra Cotta Planter